Why is Outlook Redirecting to Microsoft 365 During Setup?
Published: November 11, 2025
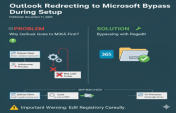
You're trying to set up your work email on a new Outlook client. You know your company uses an On-Premises Exchange server. You type in your email address, click "Connect," and... you're presented with a Microsoft 365 login screen instead of your company's server prompt.
Don't panic—you didn't do anything wrong. This is a common and, in most cases, *expected* behavior from modern versions of Outlook due to the way its "Autodiscover" service works.
So, why does this happen, and more importantly, how do we force Outlook to skip the M365 check and look directly for our On-Premises server?
???? The Problem: Why Does Outlook Go to Microsoft 365 First?
The answer lies in the priority list Outlook follows to find your server settings.
When you enter your email address (like user@company.com), Outlook kicks off a process called Autodiscover. Modern Outlook versions (Outlook 2016, 2019, 2021, and M365 Apps) are now programmed to check for a Microsoft 365 / Exchange Online account first, before they even bother looking at your local DNS records.
Outlook sends a query directly to Microsoft's own authentication endpoint (autodiscover.outlook.com). This can cause confusion and setup failures, especially in companies that are 100% On-Premises and have no hybrid connection to M365.
????️ The Solution: Bypassing the M365 Check with Regedit
We can force Outlook to change this behavior and skip the M365 check. The solution is a simple key added to the Windows Registry (Regedit).
⚠️ Important Warning: Incorrectly editing the Windows Registry can cause system instability or prevent your computer from booting. Please follow these steps carefully. If you are not comfortable, ask an IT professional for help. It's always a good idea to back up your registry first.
Step-by-Step Registry Edit
- Open Regedit
- Press Windows Key + R on your keyboard.
- In the "Run" box, type
regeditand press Enter.
- Navigate to the Correct Path
In the Registry Editor, use the folders on the left or paste the following path into the address bar at the top:
HKEY_CURRENT_USER\Software\Microsoft\Office\16.0\Outlook\AutoDiscover- Office Version Note: The
16.0key applies to Office 2016, 2019, 2021, and M365 Apps. If you are using Office 2013, the path will use15.0instead. - If the
AutoDiscoverkey (folder) does not exist: You must create it. Right-click on theOutlookkey, select New > Key, and name itAutoDiscover.
- Office Version Note: The
- Create a New DWORD Value
- With the
AutoDiscoverkey selected, right-click on the empty white space on the right side. - Select New > DWORD (32-bit) Value.
- With the
- Name the Value
Rename the new value to exactly this (no typos):
ExcludeExplicitO365Endpoint - Set the Value
- Double-click the
ExcludeExplicitO365Endpointvalue you just created. - In the small window that pops up, change the "Value data" box from
0to1. - The "Base" (Hexadecimal) can be left as is. Click OK.
- Double-click the
- Close and Restart
- Close the Registry Editor.
- Completely close Outlook (check Task Manager to be sure) and restart it.
???? What Did We Just Do?
By adding the ExcludeExplicitO365Endpoint key and setting its value to 1 (which means "True"), we gave Outlook a simple command:
"When you run the Autodiscover process, please SKIP the first step where you check the Microsoft 365 endpoint. Move directly to the other methods (like checking our local DNS)."
After making this change, when you try to set up your email account again, you'll find that Outlook no longer redirects to the Microsoft 365 login. Instead, it will correctly find your On-Premises server (or show the classic, small login prompt) and proceed with the setup as expected.
