In this guide, we will walk through the process of renewing an expiring SSL certificate on Microsoft Exchange Server 2019. SSL certificates are vital for Exchange servers, securing critical services like Outlook Web App (OWA), the Exchange Admin Center (ECP), ActiveSync, and secure email transport (SMTP/TLS). Therefore, performing the renewal process correctly is essential for maintaining a secure and functional environment.
This guide covers not only the standard renewal steps using the Exchange Management Shell (EMS) but also how to troubleshoot common errors, such as the dreaded PrivateKeyMissing issue. This ensures you have a complete, real-world guide to get the job done right.
Let's get started!
First, we need to identify the certificate that is about to expire on our server. We will need its "Thumbprint" for several steps in this process.
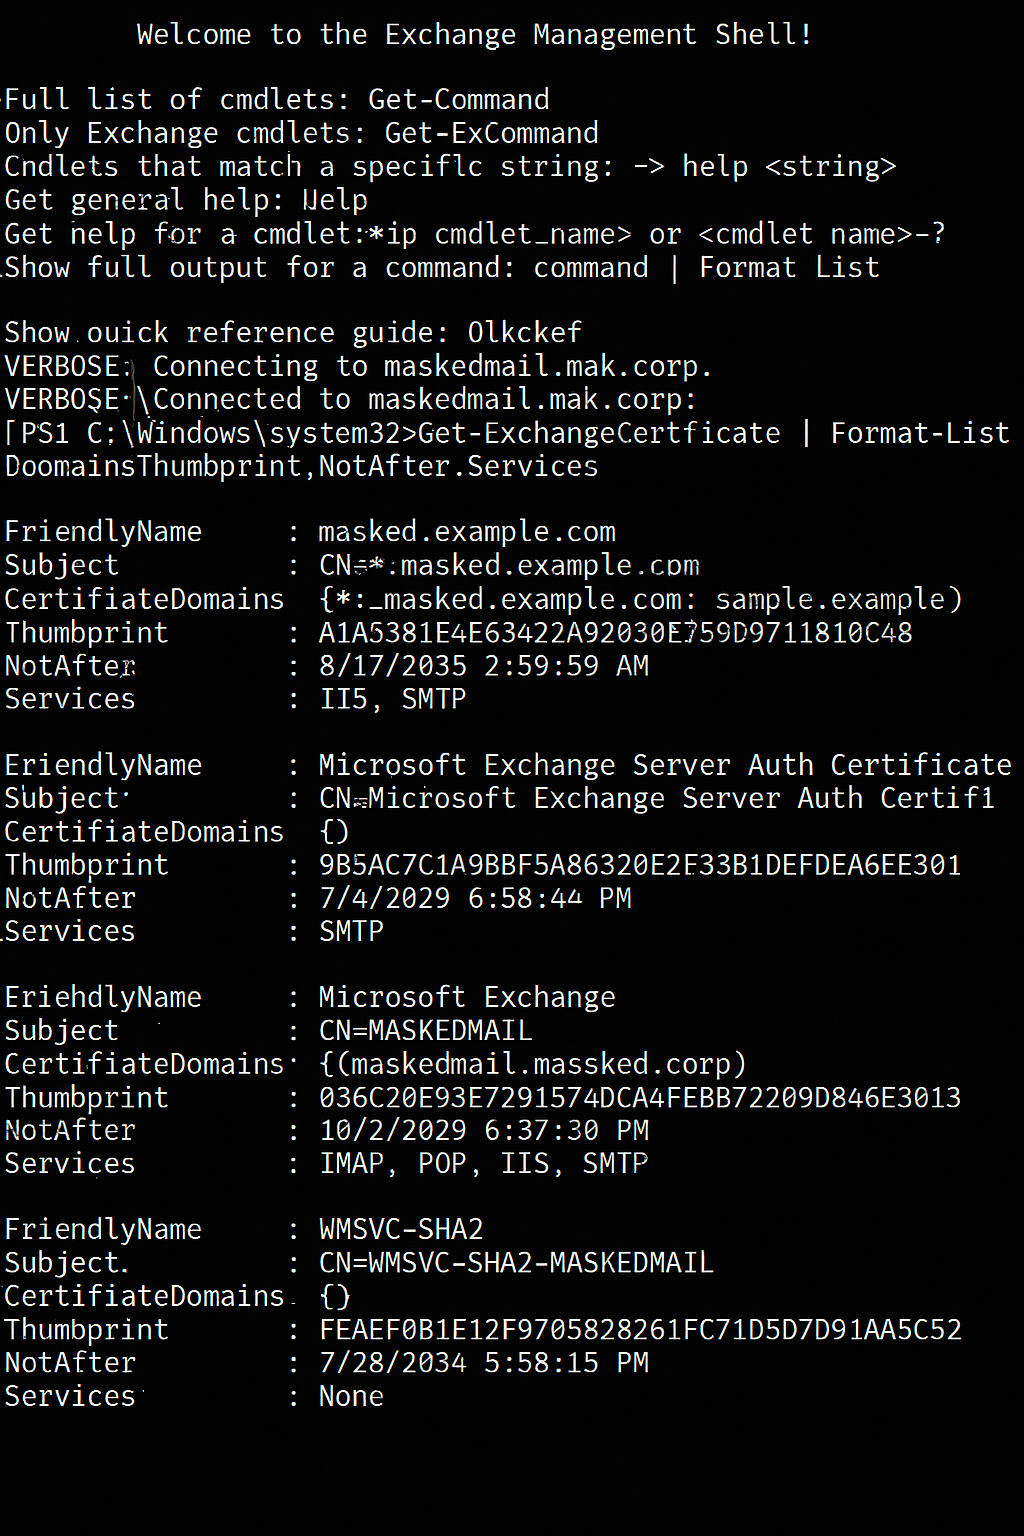
Run the Exchange Management Shell (EMS) as an Administrator and execute the following command:
Get-ExchangeCertificate | Format-List FriendlyName,Subject,CertificateDomains,Thumbprint,NotAfter,ServicesIn the output, find the certificate with the approaching NotAfter (Expiration Date) and copy its Thumbprint value to a notepad.
To obtain a new certificate from your Certificate Authority (CA), you must first generate a Certificate Signing Request (CSR). The CSR is an encrypted block of text that contains your domain names and server information.
We will use the following commands to generate the CSR and save it to a .req file. Remember to replace the domain names in the command with your actual domains.
# Assign the CSR request to a variable
$csr = New-ExchangeCertificate -GenerateRequest -FriendlyName "yourdomain.com Wildcard" -PrivateKeyExportable $true -SubjectName "C=UK, ST=London, L=London, O=Erkmenhost LTD, CN=*.erkmenhost.com" -DomainName "*.erkmenhost.com" -KeySize 2048 | Out-File -FilePath "C:\CertRequest_erkmenhost.req"
Note: The -PrivateKeyExportable $true parameter is highly recommended as it allows you to back up the certificate's private key.
Copy the contents of the newly created CertRequest_yourdomain.req file and paste it into the appropriate field on your CA's website to begin the renewal process.

Once your CA has validated your request, they will provide you with the new certificate file (usually with a .cer or .crt extension). Copy this file to an accessible location on your Exchange server (e.g., a folder named C:\Certs).
Now, import this new certificate into Exchange using the following command:
Import-ExchangeCertificate -FileData ([System.IO.File]::ReadAllBytes('C:\Certs\your_certificate_file.crt'))When this command executes, it will display the new Thumbprint of the imported certificate. This new thumbprint is critical for assigning services to the certificate.

This is the most critical part of the process. We will now attempt to assign services like IIS and SMTP to our new certificate, and we will also cover a very common error that can occur here.
Normally, you would enable the certificate with the following command:
Enable-ExchangeCertificate -Thumbprint [Thumbprint_Of_Your_NEW_Certificate] -Services IIS,SMTPHowever, this command can sometimes fail with the PrivateKeyMissing error. This error means that the private key, which was created when you generated the CSR, did not properly link with the public certificate you just imported.

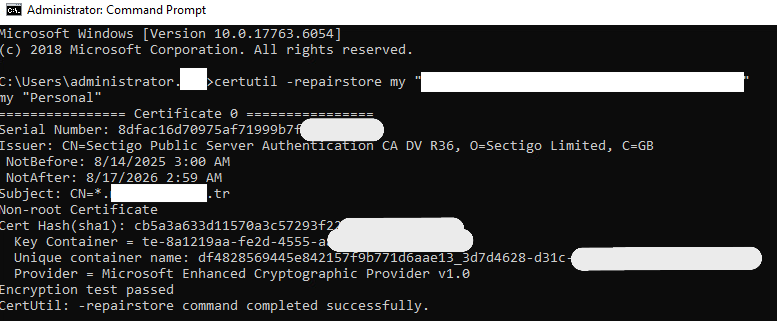
Fortunately, the fix is straightforward. Open a Command Prompt (CMD) as an Administrator (not PowerShell for this step) and run the following command. Replace the value in quotes with the thumbprint of your new certificate.
certutil -repairstore my "[Thumbprint_Of_Your_NEW_Certificate]"This command will repair the certificate store, re-associating the private key with the certificate.
After the repair is complete, return to the Exchange Management Shell and run the `Enable-ExchangeCertificate` command again.
Enable-ExchangeCertificate -Thumbprint [Thumbprint_Of_Your_NEW_Certificate] -Services IIS,SMTPThis time, the command will prompt you to confirm overwriting the existing default SMTP certificate. Press A (for Yes to All) and hit Enter.

Once the command completes successfully, your new certificate is active and serving Exchange services!
To be certain everything is working, open a web browser and navigate to your OWA address. Click the padlock icon in the address bar to inspect the certificate details and confirm that the new expiration date is shown and that there are no browser errors.
After confirming that everything works correctly, it is good practice to remove the old, expired certificate to prevent any future confusion. You can do this with the following command:
Remove-ExchangeCertificate -Thumbprint [Thumbprint_Of_Your_OLD_Certificate]Congratulations! You have successfully renewed your Exchange Server 2019 SSL certificate. This process can seem complex, especially when encountering unexpected errors like PrivateKeyMissing. However, by following these steps systematically and troubleshooting correctly, you can ensure your infrastructure remains secure and fully functional.